Showing posts with label ATSLAN CRAFT. Show all posts

Monday, 1 December 2014

Hemp Pendant Cords

I have always made cords for the pendants we sell and although we sell the materials needed to produce your own cords, I feel I should have them available for those we wish to replace the cord on a cherished pendant.

The cords themselves are made from wild himalayan hemp twine that has been handspun and naturally dyed. We also have a selection of undyed cords. Using a block of beeswax to coat each thread, I hand twist each cord into a strong 6 ply. All cords have a loop and toggle closure and can be shortened to suit the length required. I hand make toggles from many types of wood, bone, antler and horn and have used mostly coconut for our first batch of cords. For lighter and smaller pendants I use a finer machine spun European undyed hemp which results in a much finer cord.

We often get asked for pendant cords so we have now made them available at our stall in Totnes market each Friday and Saturday.


Wednesday, 20 November 2013

Heat Branding Leather Patches

I think heat branding a simple logo is much more interesting than any form of modern print. The only factors to consider is the size of your print/brand run and whether you can find someone to create a metal brand. As we tend to keep the quantity of our handmade products fairly low, creating heat branded leather patches was an option I welcomed. We have a few simple brands that blacksmiths in Nepal made to order. The actual branding itself is quite simple and doesn't take much time, although cutting the leather to shape and size can be time consuming.

 I always use a simple butane gas blow torch, which can usually be found in any large hardware store. I've found it much quicker and more comfortable using a flame that is fairly small and concentrates the heat. A wooden handle or plenty of thick leather on the brand is a must, but you could still do with a pair of thick gloves. A simple flat piece of wood that I don't mind marking usually provides a firm work surface. I don't know if wood is the best backing material or not, but it works for me. Many woods also happen to take hot brands well and a heat brand is a great way for many woodcraft artisans sign their work.

Getting the most brands from the leather hide means minimising wastage, I cut the leather into strips so I only need to focus on the distance between each brand. A spare scrap of leather is good to have at hand because you'll most likely want to test how much heat is in the brand. A really hot brand wouldn't need as much time and pressure in the leather to make its mark. I regularly have to reheat the brand when branding labels in any quantity.
  
If you use a scalpel or any type of cutter regularly, you'll probably have a cutting mat. If not, that flat piece of wood that  you don't mind marking would do just fine. Leather and wooden work surfaces dull a scapel blade fairly quickly, but they're excellent for precise cutting. Best I mention "taking care with scapels and cutters and remembering that blades can brake easily", but with hindsight I'm more likely to say "accidents will and do happen!"
If you intend to machine stitch a thick leather patch to another material, make sure your needles are suitable for the leather. The sample below has been hand stitched on to woven wool.


Tuesday, 29 October 2013

New Atslan Pendants

New pendants now available online.

Each of these pendants and cords have been handmade here in the UK using a variety of natural materials from around the world.To view a small selection of our hand crafted pendants, please follow the link below. Alternatively, come along to Totnes market on either a Friday or Saturday to see similar designs.


Tuesday, 8 October 2013

Loom Frame For A Mini Rigid Heddle

Although I have enjoyed strap weaving with a mini rigid heddle, until now all of my straps became much narrower than the heddle as all the warp threads were staked to a single point at each end.
The concept of incorporating a beam on which to load the warp and another beam to hold the woven fabric is not new and basic horizontal looms have been in use since at least the later medieval period. One clear advantage to beam looms is that the warp threads can be kept evenly spaced out during the weave, this will help weave as wide a fabric as the heddle allows. Having all the warp loaded also requires less work space.

The mini loom frame above has been designed to work comfortably with our mini rigid heddles. I cut the two side frames from two old larch panels that still had a little life left in them. Larch is very much valued for its tough, waterproof and durable qualities. Attached to the pine dowel beams are lengths of willow, these are for the warp threads to tie to. The beams have 8mm threaded rods inserted at each end. Wingnuts are used to hold the frame together and also to lock the beams firmly whilst weaving.

A two ply cotton thread is shown for the warp and a mix of hemp, hemp-cotton and hemp-wool for the weft. All colours are traditional naturals dyes. The frame works well for weaving with a rigid heddle and I'll report at a later date how the frame will fair for tablet weaving.

 As this frame has been specifically designed for use with our mini rigid heddle, it was important to make this device as compact as possible whilst maintaining ease of use. The frame can be taken down in seconds making it ideal for easy transportation. Measuring 30cm x 19cm x 10cm, it isn't really that difficult to carry around whilst set up with a loaded beam.
This prototype will be produced and available through our website during spring 2014.

Please follow the link below to view the blog entry regarding use of this frame for my first attempt at tablet weaving:
http://sorazora.blogspot.co.uk/2013/10/tablet-weaving.html


Wednesday, 2 October 2013

Weaving Waxed Hemp On A Rigid Heddle

Having acquired a simple heddle loom frame back in the summer, it was about time I cleaned it up and got it back to work. The heddle that came with it was the width of the frame, but sadly too finer a heddle to be able to cope with an uneven handspun hemp twine. Our mini rigid heddles are more than up for the task so I took full advantages of using the frame as opposed to staking out all the warp threads to a single point at each end.
 The benefit to this frame is being able to warp up the beam with a few metres at a time whilst still keeping everything compact and easy to work with. Another major difference is the ability to have all the warp threads run parallel and true to the holes and slots of the heddle, this creates wider fabric compared to having all your warp threads heading to a single immovable stake. We are thinking to develop a similar frame on a slightly smaller scale that wood suit our mini rigid heddle, but that remains to be seen as yet!

 One of the difficulties I find with weaving handspun hemp or nettle fibre is that the naturally uneven twine can easily get worn in places leading to rather inconvenient repair missions. Through making waxed cordage for pendants, I noticed that a handspun twine becomes easier to work with if given a quick floss through a block of beeswax. It removes the twine's tendency to twist up on itself and is also more forgiving if you need to undo any knots (something I greatly appreciate if working with macrame).

 Each of the handspun hemp twines in the image above are all organic wild Himalayan hemp which has been harvested, retted and then handspun in the remote villages of the Himalayan foothills very much in the same way as it has been done for centuries.
The dying we organise ourselves and use only traditional natural dyestuffs and mordants. Weaving with wax coated hemp twine was a first for me and I was keen to know if the resulting fabric could bring any new craft applications.


 The beam on the loom frame was loaded with just over two metres of twine and with each warp thread doubled for added strength. Each of these twines had to be pulled through the wax one or two times to give them a smoother, tighter appearance. I must admit that it is an added effort, especially as all the weft threads would go through the same treatment. As I planned to use as many natural dye colours that I could get my hands on, it worked out a lot easier to load up several shuttles with different colours and always having the selection to hand.

The resulting weave was still fairly loose even after using a beater so I took advantage of another benefit to waxed thread. Due to both warp and weft threads all being waxed, they can slide over each other with relative ease. This fact allowed me to slide all the weft threads by hand to compact them. This action also adds another element of effort, but the extremely tight weave in combination with the beeswax coating makes for a fabric far more resistant to water and abrasive wear and tear.

Wednesday, 18 September 2013

Yakusugi Pendants

Last year a good friend gave me a block of Yakusugi wood as a souvenir from Japan. Yakusugi is a Japanese term for Cryptomeria that are more than 1000 years old and originating from Yakushima island.

Cryptomeria is unique to Japan, where it is known as Sugi and often called Japanese cedar in English, though the tree is part of the cypress family and not related to the true cedars.

Japanese cedar generally lives for 500 years. Due to the less nutritious granite soil of Yakushima island, the cedar there grows much slower with a tighter grain and can survive for more than 2000 years.


Yakusugi has to endure high humidity and rainfall and has evolved with a higher resin content which makes then more resistant to rotting.
Since it is no longer permitted to fell Yakusugi today, souvenirs such as mine are made from the stumps of previously felled trees or those that have fallen in typhoons.


The beautiful grain of Yakusugi lends itself well to decorative items and as such I decided to craft a few pendants with this soft wood. As this wood is fairly light, I felt the need to give it a harder backing by creating a twin laminate using 'Ipe - Brazilian ironwood'. The darker tone works well to both strengthen the pendant and highlight the lighter Yakisugi.
The style of the pendant and the distinctive stringing are directly inspired by native New Zealand Toki pendants that are traditionally crafted from jade. All string work is a strong 100% hemp coated in beeswax prior to twisting.

These and similar pendants will soon be made available in our online store.


Wednesday, 14 August 2013

Stone Arrowhead Pendants

Being quite keen on archery, I was delighted to be able to source a selection of stone arrowheads that have been hand-knapped by various artisans in Arizona, USA near the Mexican border.

 Knapping is a traditional skill that dates back to the stone age and widespread across the globe. I have paired each arrowhead with an undyed linen cordage that has been made up from several beeswax coated strands twisted together, very similar to traditional bow strings throughout the centuries.

 The closure for each pendant is a simple loop and monkey's fist. A monkey's fist is a sailors knot that is tied to the ends of a rope, acting as a weight, when throwing lines between ship and dock.

A selection of five different stone arrowhead pendants are now available online. For more information about these timeless pieces, please follow the link below:

www.sorazora.com/shop/sub_category/tokyo_craft/atslan.html


Monday, 7 January 2013

Hand Carved Craft Tools

As much as I love working with bone and horn, I have enjoyed carving various hardwoods into craft tools.
Below is a selection of tools used for needle binding, braiding or weaving. All have been carved from either boxwood, ironwood, ash or bamboo.

 The image below shows four slightly different styles of weaving shuttle. The weft thread is wound onto the shuttle to be passed through the shed in the warp threads. These styles are based on shuttle designs that have been in existence for many centuries. Unlike other shuttles that I have made, these are slightly more user friendly as the shuttle doesn't unwind so much if dropped (and I tend to drop things regularly!). Two of the shuttles have a flat bladed edge along one side, this is so the shuttle can also act as a simple beating stick to tighten as you weave.

 The selection of needles below have been carved from either ironwood, ash or bamboo. They can be used for many different applications involving a thick yarn or twine. This style of needle is commonly used in needle binding.


Thursday, 27 December 2012

Crafting With Uxi Seeds

I was recently introduced to Uxi seeds as a craft material and found very little information about them, other than the seeds offer a beautiful texture for miniature carving and the seed pods are commonly used in dry flower arranging. After a fair bit of research and translating texts from the Galician and Portuguese languages, I slowly managed to piece some background information together.

Uxi (Endopleura uchi) is a large evergreen tree indigenous to a couple of states in Brazil and well distributed within the forests. It is considered a hardwood and its straight cylindrical trunks are often used as a local building material.

 The fruit of uxi was commonly known as "fruit of the poor" as it was very inexpensive. Today it has gained popularity and the green egg-sized fruit fetches a good price in the local markets.
Shown in the image above is a seed that has been cut from the pod. These pods are covered with a thin oily pulp which can be eaten raw when ripe. This thin layer of woody flavoured flesh is most loved in icecream and also makes a good quality oil for both cooking and medicine. The bark of the tree is commonly used as a natural medicine when made in to tea.

 The seed is very hard (harder than betel nut and similar to tagua) and lends itself well to carving and polishing. Most of the items crafted from uxi that I have researched tend to be delicate items turned on a lathe. I hand carved the mushroom pendant above and crafted the ivory white stem from tagua. The cord is a 3ply linen that I coated with beeswax prior to twisting.

 Buttons are a fairly obvious and easy item to cut from the long seeds and hard enough to slice quite thinly. I have yet to experiment with how these buttons will fair if put through many washes, but imagine they should be fine. The image below shows a wallet that I made using buffalo leather sourced from Nepal with a single uxi button providing the closure.

The use of uxi in amulets is believed to bring the wearer good luck and protect them from ill health. The savoury fruit is extremely popular with a variety of mammals as it is an excellent source of calories, high in fibre and rich in minerals and vitamins. As this fruit plays an important role in the diet of wildlife, it is common for hunters to set traps near and around uxi trees.


Friday, 30 November 2012

Tagua & Betel Nut Pendants

Working with tagua nuts is fairly new to me, although I have been aware of their existance for some time now. Tagua palms are known by several names and grow in South America from southern Panama along the Andes to Ecuador, Bolivia and Peru, with Brazil's native species dominating international trade.
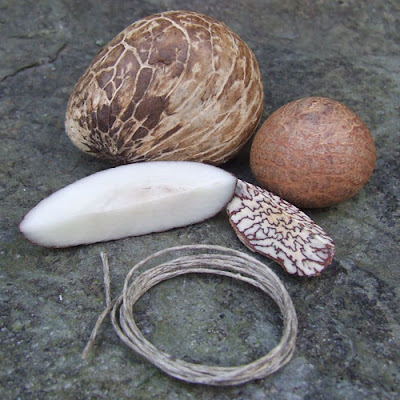
The large nut on the left of the image below is the whole tagua nut with a thin slice showing its hard white interior in front.
The use of these nuts stimulates local economies in South America and is said to be a substitute for the use of ivory as it has similar texture and appearance. It is for this reason that tagua nuts are commonly referred to as vegetable ivory.

The smaller nut to the right in the image above is a betel nut. Although it is commonly referred to as a betel nut, it is in fact the seed of the areca palm, which grows in much of the tropical pacific. After the seed has dried into a wood-like consistency, it reveals a beautiful pattern as shown in the small slice.
This nut is usually sliced thinly and wrapped in a betel leaf (hence its erroneous nickname) along with other spices to be chewed as a mild stimulant.

 These are my first attempts at using tagua for creating pendants and as you can see, I have inlayed betel nut into the thin slices of tagua to illustrate the contrast of the betel nut's pattern to the plain ivory white of the tagua. The pendant in the centre has been backed with buffalo leather that has been stitched into place and then adorned with a single red sandalwood seed That I sourced in Western Australia many years ago.

All of the cordage has been crafted from a European grown/produced hemp thread that I coated in beeswax prior to twisting. The image above shows the completed pendant and 6 ply cord. The toggle has been crafted from a single seed from a rather large seed pod of the Royal Poinciana tree, also sourced from Western Australia.


Tuesday, 27 November 2012

Making A Dreamcatcher

As well as selling organic craft materials ideal for making dreamcatchers, we also create a few ourselves and have recently been crafting a wide variety of styles and sizes using only organic materials. This blog illustrates the different stages for making the dreamcatcher shown in the above photo.

We supply three different sizes of cane rings and will expand the size ranges for our 2013 stock. I recommend cane rings as they are light and sturdy, but a dreamcatcher could be made out of almost any roughly circular ring. The beads I have chosen to use are ritha seeds, these are the hard seeds found in the centre of soapnuts.

If you have produced a ring from willow or any other naturally attractive material, perhaps you would wish to leave it bare. I have chosen to cover the this cane ring with wild Himalayan handspun hemp that we have dyed using traditional natural dyes. I prefer to coat the twine with beeswax by gently flossing the twine through a block of wax, this is purely optional. Other materials we often use from our selection for this purpose are wool, blended hempwool yarns and nettle twine.

The use of beads helps add a personal touch to dreamcatchers and needs to be decided prior to threading. The above image shows how the initial pass of the thread around the ring is attached after being tied at your starting point. As you can see, I have added beads into the initial pass, although usually I tend to add beads at a slightly later stage of threading. This method of attaching the twine (in this case 4 ply giant Himalayan nettle) is all that is required to complete the web. The second and subsequent passes no longer wrap around the cane, but around the twine of the previous pass.

With this dreamcatcher, I decided to incorporate a smaller cane ring into the centre and have wrapped this smaller ring with hemp in exactly the same way as the larger ring. After several passes on the larger ring, I added some more beads and then one more pass running through the beads to tighten everything off. For a larger web I would have just continued threading the beeswax coated nettle until I reached the centre. It is important to maintain a nice even tension otherwise your ring can be pulled slightly out of shape if too tight or alternatively result in a loose web if lacking in tension.

The next step is a little more unusual as I planned on weaving a yarn into the dreamcatcher as opposed to just a plain web. To weave the weft yarn I need a firm warp thread to weave around. I secured the smaller ring in the centre using a temporary thread and then used the original nettle twine to create a permanent fix (and warp threads) between the small ring and the beads. Again, an equal tension is vital. The photo below shows the dreamcatcher ready for the weaving stage.

In keeping with the three colours of the hemp twine used to cover the ring, I have selected blended hempwool yarns dyed with the same natural dyes to complete the weaving. This stage is a little time consuming, but not too difficult and you can easily change yarn colours.

The image below shows the dreamcatcher in an almost finished state with all knots tied off and loose ends trimmed. It was for purely aesthetical reasons that I broke the weaving sections up into to three segments. I could have been possible to weave a continues circle or indeed a dreamcatcher comprising of just weaving.

Not shown in any photographs is the hemp twine used to craft the hanging loop. I used hemp of the same three colours that were waxed and then twisted together to make a thicker twine. Instead of the traditional use of feathers, I chose to craft tassels from the blended hempwool, wooden beads and then attached using the nettle twine. The number and length of tassels is entirely upto you, as are pretty much all of the choices made in crafting a dreamcatcher. I understand that this is not a traditional looking dreamcatcher and maybe not suitable for your first go at making one, but it should hopefully help inspire anyone to have a go and be experimental. As with most crafts, imagination is the bulk of the recipe with a dash of patience and craft skill.

All of the materials used for this dreamcatcher and a wide range of other organic materials are available from our online store and can be shipped worldwide.
As always, enquiries and general queries are always welcome. We can be contacted through our contact link on our homepage which can be reached by the link below.


Friday, 23 November 2012

Deer Antler Pendants

These are the five latest pendants to be uploaded into our Atslan gallery within our Tokyo Craft section. Here you can find individually crafted pendants not only by myself, but also Tokyo Green Glass, Neo Glass and Stone Dance.

The betel nut and turquoise pendants encased in buffalo leather are those from the previous blog entry, but the new pendants are slices of deer antler filled with clear resin that holds segments of buffalo bone in place.

The cord for this pendant has been crafted from six strands of beeswax coated linen which has been hand twisted tightly in the traditional manner and the toggle has been carved from the Nepalese hardwood Saz, a large sub-himalayan tree found up to an altitude of 1200m.

To view these and other pendants from Atslan, please follow the link below to the gallery page.


Monday, 29 October 2012

New Atslan Pendants


Betel Nut & Buffalo Leather Pendants

Betel nut is the common name although strictly speaking they are areca nuts from a tropical Asian palm and not from the Asian evergreen climbing plant called betel. Its soft woodlike texture makes it fairly easy to carve and provides a beautifully unique pattern each time. Areca nut is often wrapped in betel leaf and chewed in many Asian and Oceanic countries as a stimulant.


The cord for the pendant shown above has been created from six strands of beeswax coated hemp which have been twisted tightly in the traditional manner. For this style of cord I use many types of natural fibre ranging from linen, hemp, nettle, cotton to bamboo. The toggle has been carved from the Nepalese hardwood Saz, a large sub-himalayan tree found up to an altitude of 1200m, although I often use Ipe (Brazilian hardwood).


Thursday, 18 October 2012

Betel Nut Mushrooms

The photo above shows the materials used for the mushroom pendants. Betel nuts are of course the main component twinned with either Ipe (Brazilian hardwood) or Saz (Nepalese Hardwood).
Also shown is cork and a section of a UK vine.

Betel nut is the common name although strictly speaking they are areca nuts from a tropical Asian palm and not from the Asian evergreen climbing plant called betel. Its soft woodlike texture makes it fairly easy to carve and provides a beautifully unique pattern each time. Areca nut is often wrapped in betel leaf and chewed in many asian and Oceanic countries as a stimulant.

The cord for the pendant shown above has been created from six strands of beeswax coated linen which have been twisted tightly in the traditional manner. For this style of cord I use many types of natural fibre ranging from linen, hemp, nettle, cotton to bamboo. The toggle has been carved from the Nepalese hardwood Saz, a large sub-himalayan tree found up to an altitude of 1200m.
The photo below shows the use of the cork and vine.