Friday 30 November 2012

Tagua & Betel Nut Pendants

Working with tagua nuts is fairly new to me, although I have been aware of their existance for some time now. Tagua palms are known by several names and grow in South America from southern Panama along the Andes to Ecuador, Bolivia and Peru, with Brazil's native species dominating international trade.
The large nut on the left of the image below is the whole tagua nut with a thin slice showing its hard white interior in front.
The use of these nuts stimulates local economies in South America and is said to be a substitute for the use of ivory as it has similar texture and appearance. It is for this reason that tagua nuts are commonly referred to as vegetable ivory.

The smaller nut to the right in the image above is a betel nut. Although it is commonly referred to as a betel nut, it is in fact the seed of the areca palm, which grows in much of the tropical pacific. After the seed has dried into a wood-like consistency, it reveals a beautiful pattern as shown in the small slice.
This nut is usually sliced thinly and wrapped in a betel leaf (hence its erroneous nickname) along with other spices to be chewed as a mild stimulant.

 These are my first attempts at using tagua for creating pendants and as you can see, I have inlayed betel nut into the thin slices of tagua to illustrate the contrast of the betel nut's pattern to the plain ivory white of the tagua. The pendant in the centre has been backed with buffalo leather that has been stitched into place and then adorned with a single red sandalwood seed That I sourced in Western Australia many years ago.

All of the cordage has been crafted from a European grown/produced hemp thread that I coated in beeswax prior to twisting. The image above shows the completed pendant and 6 ply cord. The toggle has been crafted from a single seed from a rather large seed pod of the Royal Poinciana tree, also sourced from Western Australia.


Tuesday 27 November 2012

Making A Dreamcatcher

As well as selling organic craft materials ideal for making dreamcatchers, we also create a few ourselves and have recently been crafting a wide variety of styles and sizes using only organic materials. This blog illustrates the different stages for making the dreamcatcher shown in the above photo.

We supply three different sizes of cane rings and will expand the size ranges for our 2013 stock. I recommend cane rings as they are light and sturdy, but a dreamcatcher could be made out of almost any roughly circular ring. The beads I have chosen to use are ritha seeds, these are the hard seeds found in the centre of soapnuts.

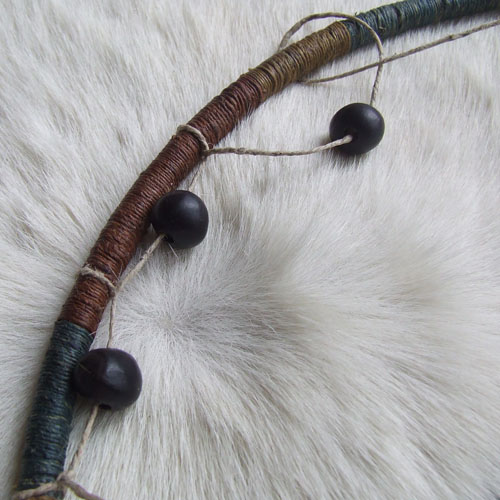
If you have produced a ring from willow or any other naturally attractive material, perhaps you would wish to leave it bare. I have chosen to cover the this cane ring with wild Himalayan handspun hemp that we have dyed using traditional natural dyes. I prefer to coat the twine with beeswax by gently flossing the twine through a block of wax, this is purely optional. Other materials we often use from our selection for this purpose are wool, blended hempwool yarns and nettle twine.

The use of beads helps add a personal touch to dreamcatchers and needs to be decided prior to threading. The above image shows how the initial pass of the thread around the ring is attached after being tied at your starting point. As you can see, I have added beads into the initial pass, although usually I tend to add beads at a slightly later stage of threading. This method of attaching the twine (in this case 4 ply giant Himalayan nettle) is all that is required to complete the web. The second and subsequent passes no longer wrap around the cane, but around the twine of the previous pass.

With this dreamcatcher, I decided to incorporate a smaller cane ring into the centre and have wrapped this smaller ring with hemp in exactly the same way as the larger ring. After several passes on the larger ring, I added some more beads and then one more pass running through the beads to tighten everything off. For a larger web I would have just continued threading the beeswax coated nettle until I reached the centre. It is important to maintain a nice even tension otherwise your ring can be pulled slightly out of shape if too tight or alternatively result in a loose web if lacking in tension.

The next step is a little more unusual as I planned on weaving a yarn into the dreamcatcher as opposed to just a plain web. To weave the weft yarn I need a firm warp thread to weave around. I secured the smaller ring in the centre using a temporary thread and then used the original nettle twine to create a permanent fix (and warp threads) between the small ring and the beads. Again, an equal tension is vital. The photo below shows the dreamcatcher ready for the weaving stage.

In keeping with the three colours of the hemp twine used to cover the ring, I have selected blended hempwool yarns dyed with the same natural dyes to complete the weaving. This stage is a little time consuming, but not too difficult and you can easily change yarn colours.

The image below shows the dreamcatcher in an almost finished state with all knots tied off and loose ends trimmed. It was for purely aesthetical reasons that I broke the weaving sections up into to three segments. I could have been possible to weave a continues circle or indeed a dreamcatcher comprising of just weaving.

Not shown in any photographs is the hemp twine used to craft the hanging loop. I used hemp of the same three colours that were waxed and then twisted together to make a thicker twine. Instead of the traditional use of feathers, I chose to craft tassels from the blended hempwool, wooden beads and then attached using the nettle twine. The number and length of tassels is entirely upto you, as are pretty much all of the choices made in crafting a dreamcatcher. I understand that this is not a traditional looking dreamcatcher and maybe not suitable for your first go at making one, but it should hopefully help inspire anyone to have a go and be experimental. As with most crafts, imagination is the bulk of the recipe with a dash of patience and craft skill.

All of the materials used for this dreamcatcher and a wide range of other organic materials are available from our online store and can be shipped worldwide.
As always, enquiries and general queries are always welcome. We can be contacted through our contact link on our homepage which can be reached by the link below.


Friday 23 November 2012

Deer Antler Pendants

These are the five latest pendants to be uploaded into our Atslan gallery within our Tokyo Craft section. Here you can find individually crafted pendants not only by myself, but also Tokyo Green Glass, Neo Glass and Stone Dance.

The betel nut and turquoise pendants encased in buffalo leather are those from the previous blog entry, but the new pendants are slices of deer antler filled with clear resin that holds segments of buffalo bone in place.

The cord for this pendant has been crafted from six strands of beeswax coated linen which has been hand twisted tightly in the traditional manner and the toggle has been carved from the Nepalese hardwood Saz, a large sub-himalayan tree found up to an altitude of 1200m.

To view these and other pendants from Atslan, please follow the link below to the gallery page.


Tuesday 20 November 2012

Dyeing With Black Cherries


Hiromi's latest natural dye experiment is with black cherries that were harvested earlier in the year and kept frozen.
The natural fibre materials used in this experiment are pictured in the photo below, they are a silk handkercheif, felted wool, hempcotton blended yarn and hempwool blended yarn.

Like all the other dyestuffs she uses, the cherries were boiled up to extract as much colour as possible and also with just enough water to stop the dyestuff from burning. If dyeing anything in volume, plenty of water would have been more suitable to create the dyebath.

You will notice that the cherry stones haven't been removed prior to boiling, this was unintentional! We recommend the removal of the stones as it will make it easier to break up the cherries while boiling them, but allowing the stones to boil with the fruit colours them nicely if you intend to use them for beads.


The image below shows the final results from the dyeing experiment. The background is the silk handkerchief that has been tie-dyed and of the two yarns, hempwool is on the left and hempcotton is on the right. The hempcotton seems to have taken less colour, probably due to both hemp and cotton being cellulose fibres. The protein fibres of wool and silk always seem to beautifully take natural dye colours.

One point that we would like to mention is that dyes from blackberries and elderberries are generally considered as stains rather than dyes as even with the use of fixative, the colour's longevity in limited. We think cherries may be similar in this respect.

For information about other dyestuffs that we have experimented with, click on any of the links below to be taken to  the corresponding blog entry.